Checkpoint VPN
I encountered a Checkpoint firewall the other day in the course of my job and realised it had been a few years since I’d worked on one. I think Palo Alto and Fortigate have been stealing Checkpoint’s lunch in the past few years (based on no more than personal experience). At one place I worked which was migrating from Checkpoints to Palo Altos; the former’s kit was returned in Palo Alto boxes as they were the nearest to hand; ouch!
Anyway, I’ve done a lot with firewalls but it occurred to me I’d never configured a VPN on a Checkpoint firewall. To be fair it had never been a boyhood dream but nevertheless I thought it would make an interesting exercise; well for me.
Most of the issues I encountered in this lab were down to a setting in AWS I had forgotten about and which took me hours of pain-staking troubleshooting to rediscover. I don’t consider this time wasted because I know I will never forget this setting again. Lab pain trumps book-learning.
The set up is as follows: On the AWS side we have a Windows 2012 server and a Checkpoint firewall (R80.40) and on the Azure side a Fortigate firewall (6.4.3) with a loopback interface of 192.168.100.1. The exercise is to stand up a VPN between them and ping the Fortigate loopback from the AWS Windows server through the VPN tunnel.

AWS Glitch
Firstly, my AWS error. I found I couldn’t route anything off the 172.31.200.0/24 DMZ subnet (shown above) through the Checkpoint firewall though I could connect locally to the firewall. Amongst other things, I checked server routing, the AWS subnet route table, and that the server was learning the firewall interface’s mac address for external addresses but still the traffic was leaving the server but not reaching the firewall… and so I went through the interface settings again and re-discovered this….
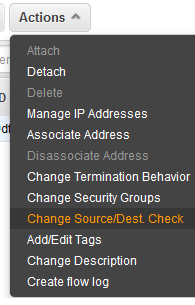
And this has to be disabled thusly…
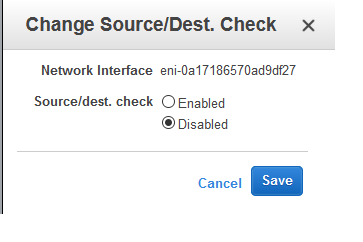
Amazon’s explanation is below…
Source/destination checking
Disabling source/destination checking enables an instance to handle network traffic that isn’t specifically destined for the instance. For example, instances running services such as network address translation, routing, or a firewall should disable the source/destination check attribute. This attribute is enabled by default.
Checkpoint VPN
I half-watched the Checkpoint video below, read a couple of third party blogs and did a bit of trial and error to provision the Checkpoint side:
First, things first, we need to make sure our Checkpoint Gateway object (the firewall) in the policy has the IPSec VPN ‘blade’ ticked:
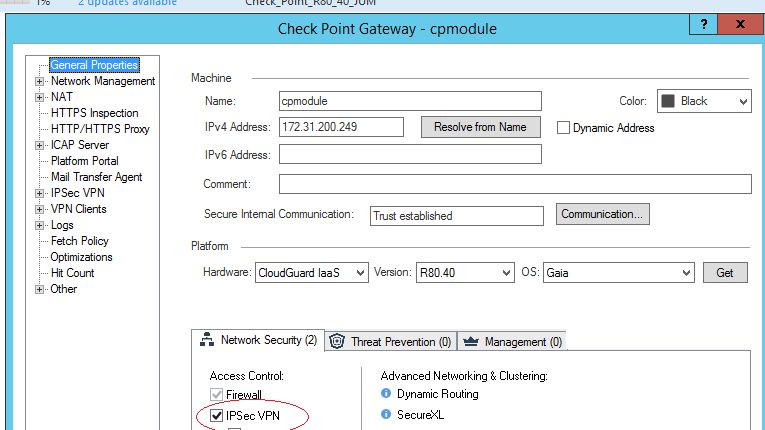
There is a VPN wizard available but I find such things generally unhelpful. They make assumptions and hide various settings.
Firstly we need to define the Fortigate as an ‘Interoperable Device’:

Then we define a VPN Community. Checkpoint assume your ambitions are grand and that you will be provisioning a ‘star’ or ‘mesh’ of VPNs… er basically I just need a ‘line’ but hey, I guess that’s a prong of a star or a bit of mesh. I chose ‘star’ anyway.
The center gateway is the Checkpoint (of course), the satellite is our Fortigate.
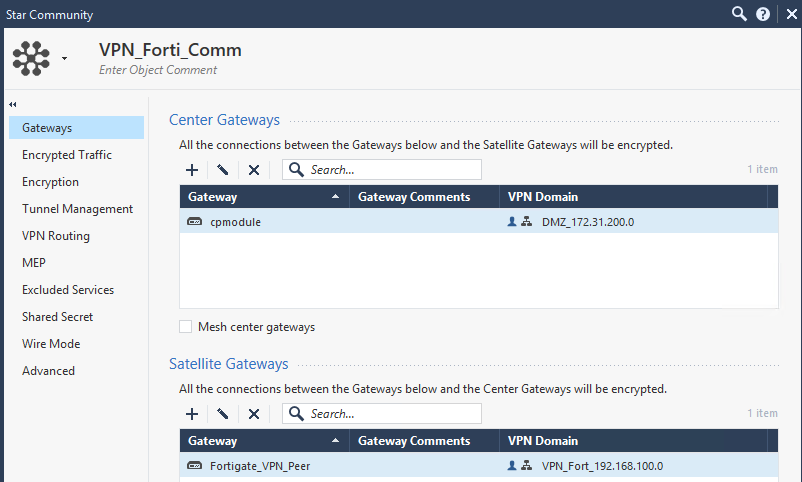
The VPN domain (as in traffic to be encrypted) is defined here. I did select this on the Interoperable device although it didn’t continue to display it here, though does show it on the community display. Hmmmm. Anyway, it is selected here on the Interoperable Device.

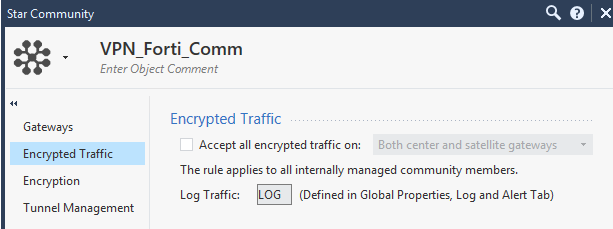
The next menu deals with whether we want to automatically accept the encrypted traffic in our policy. I preferred to do this manually so didn’t tick it…
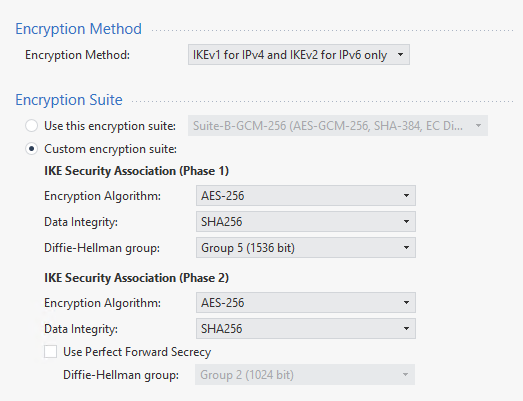
The next menu is where we define our phase one and phase two ipsec parameters. These are beyond the scope of the blog but essentially they have to match both sides. (I left PFS off, if it was production I’d turn it on, honest guv)
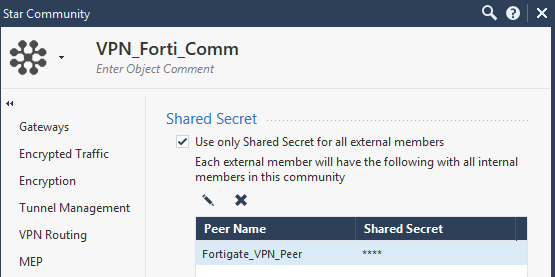
Tunnel management deals with whether you want to keep the tunnel up permanently (instead of just raising it for interesting traffic, I gather). I skipped this and the other options until ‘Shared Secret’ where I defined one for the Fortigate.
OK, as I didn’t give the VPN traffic automatic access through the firewall policy I defined a policy rule for it as follows. In the VPN column I associated this traffic with the VPN community just defined.

Fortigate VPN
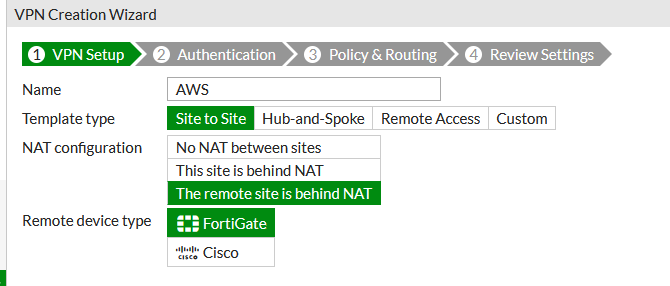
For completeness, let’s cover the Fortigate side of things. Again Fortigate steer you towards a VPN Wizard and I couldn’t find a manual option. You can generally access Forti config pretty easy on the CLI and do tweaks there but on this occasion I followed the Wizard, and selected a site-to-site VPN. I put the remote site was behind NAT though was not sure what difference this would make to the configuration (NAT-T is default). Fortigate only acknowledge the existence of Cisco as 3rd party remote device, again not clear what difference choosing this would make.
In step two, we just chose the external interface where the VPN will terminate and the pre-shared key which will match what we set up on the Checkpoint.

In the final step, we define the local and remote subnets which traffic will be encrypted in the tunnel.
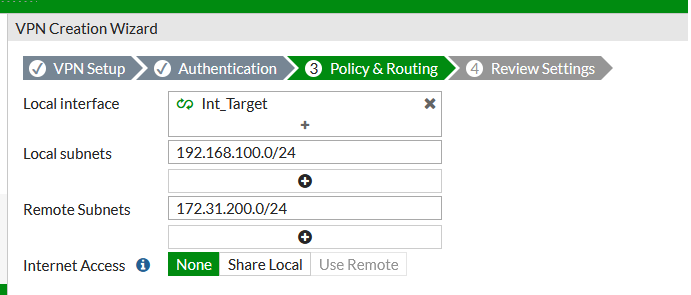
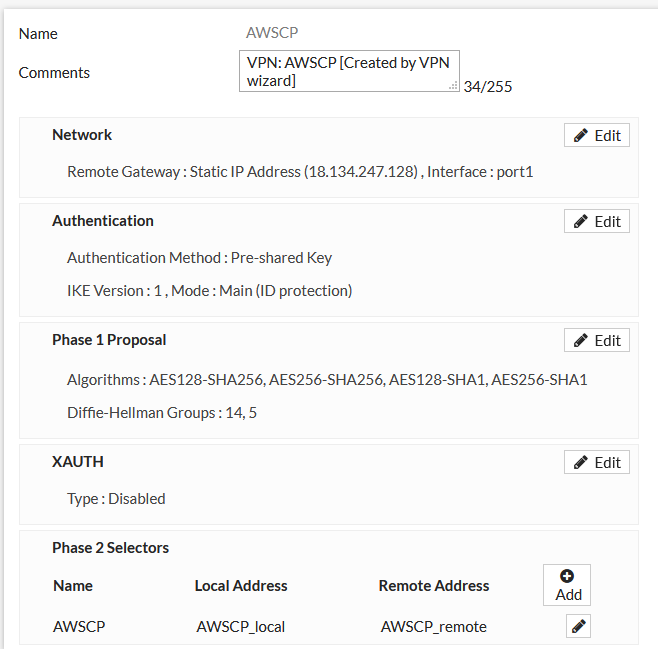
The above wizard gives you no visibility of the phase one and phase two settings you’re using but you can inspect the new tunnel in the VPN/IPSEC tunnel list and ‘convert to custom’:

This will give you access to the phase 1 and phase 2 settings which you can amend as appropriate.
I probably should have mentioned that both these processes do at least amend the routing tables appropriately and the Forti wizard creates policy rules too.
In terms of troubleshooting which you will invariably need to do on a VPN, the Checkpoint logs themselves were the best source of information. On the CLI there wasn’t much I could find apart from mention of a separate utility called IKEView which could be used on ispec logs you had SCP’ed off them off the firewall. This seems exceptionally cumbersome and I never tried it.
I lost the logs I’d used previously when I stopped the instance but I deliberately changed the pre-shared key on the Fortigate so it didn’t match and saw this error in the Checkpoint GUI logs which would be pretty helpful…

The Fortigate has much better debug tools on the CLI – easily googled – but I found the VPN Events from the Log & Reports menu enough when I originally set this up.

However, when I deliberately changed the pre-shared key, I found nothingI have always found Fortigate logging a bit hit and miss and would recommend the CLI. (Incidentally, after configuring everything correctly I’d had to reboot the Fortigate to get everything working; not sure why)
With everything configured correctly… the ping worked…

The tunnel came up (I couldn’t find an easy way of displaying the tunnel state in Checkpoint but could see successful encryptions in the logs and no phase1 or phase2 errors). Happily, the Fortigate shows you the status of the tunnel…

Our work here is done.